Habitat - Indoor :: POST YOUR BASKING AREA PICTURES HERE !!!!!!!!!!!!!!!

Turtle tank setups and other indoor configurations.

Post Posted: Tue Nov 04, 2008 1:41 pm   

untsmurf wrote:Wow looks good. I forget, do you have sand in your tank too?

Yep I accually pulled all the sand in the beach up from the bottom and dried it for the beach lol. So much easier then shopping with 4 kids :lol:
My favorite things in the world:
1 res, 3 cats, 3 bunnies, 1 dog, 2 african clawed frogs, guppies, pleco, 30+ fancy mice, 2 hermit crabs and 4 small humans
User avatar
Sassamo
 
Posts: 310
Joined: Aug 25, 2008
Location: Canada

Post Posted: Tue Nov 04, 2008 1:57 pm   

:lol: Awesome, then you don't have to worry about getting sand tracked into your tank.
~Christi
1.0 RES: Mikey R.I.P.
1.0 Het for Albino Red Tail Boa: Kaa ~adopted out
0.0.1 Northern BTS: Petri ~now a well-loved class pet

1.0 Am. Staff Mix: Brutus R.I.P.
1.0 German Shepherd: Pax

1.0 Husband: Will
0.1 Daughter: Lily
User avatar
untsmurf
Senior Member
 
Posts: 4291
Joined: Jul 28, 2007
Location: Carrollton, TX
Gender: Female

Post Posted: Sun Nov 16, 2008 2:43 pm   

This is Neptune's basking and nesting area.

ImageImageImageImage
Image
User avatar
NicoleBell
 
Posts: 46
Joined: Oct 17, 2007
Location: Edmonton

Post Posted: Sun Nov 16, 2008 4:17 pm   

Wow! I'm very impressed with your nesting area. Thank you for sharing!!!
Who ever said turtles were slow?
User avatar
crackerlady2007
 
Posts: 473
Joined: Mar 12, 2008

Post Posted: Sun Nov 16, 2008 9:32 pm   

WOW! I AM IMPRESSED WITH ALL YOUR TANK SETUPS!!!!!!!!!!!! THEY ARE ALL SO COOL! THX FOR SHARING :D
vivian89
 
Posts: 40
Joined: Feb 16, 2008
Location: Austin, tx

Post Posted: Tue Dec 02, 2008 4:55 pm   

Image
Image
Image
Thank you....
~Brody
raptr20
 
Posts: 43
Joined: Jan 27, 2008
Location: Bridgeport CT
Gender: Male

Post Posted: Sat Dec 06, 2008 10:10 am   

Image

My above-tank basking area that I made a few weeks ago. That huge bubbler has since been removed and replaced with her usual bubble stone.

I know the tank is smaller than it should be, I'm getting a 55g rather soon.
RES - Sparta - 6"
User avatar
Stalfos
 
Posts: 17
Joined: Aug 19, 2007
Location: Hartford, CT

Post Posted: Sat Dec 06, 2008 6:15 pm   

TO: Stalfo: wow your setup is so similiar to mine!*as in the basking area!


i am impressed with everyone's setups it's so incredible

KEEP 'EM COMIN'!!!!!!
vivian89
 
Posts: 40
Joined: Feb 16, 2008
Location: Austin, tx

Post Posted: Wed Dec 10, 2008 12:33 pm   

Melek's home :)

Image

Image

Image

Image

Image
User avatar
pinar
 
Posts: 25
Joined: Nov 17, 2007
Location: Istanbul - Turkey

Post Posted: Wed Dec 24, 2008 3:12 am   Here is my above tank set up

ImageImage
Image
Image
Image
Image
Image
Image


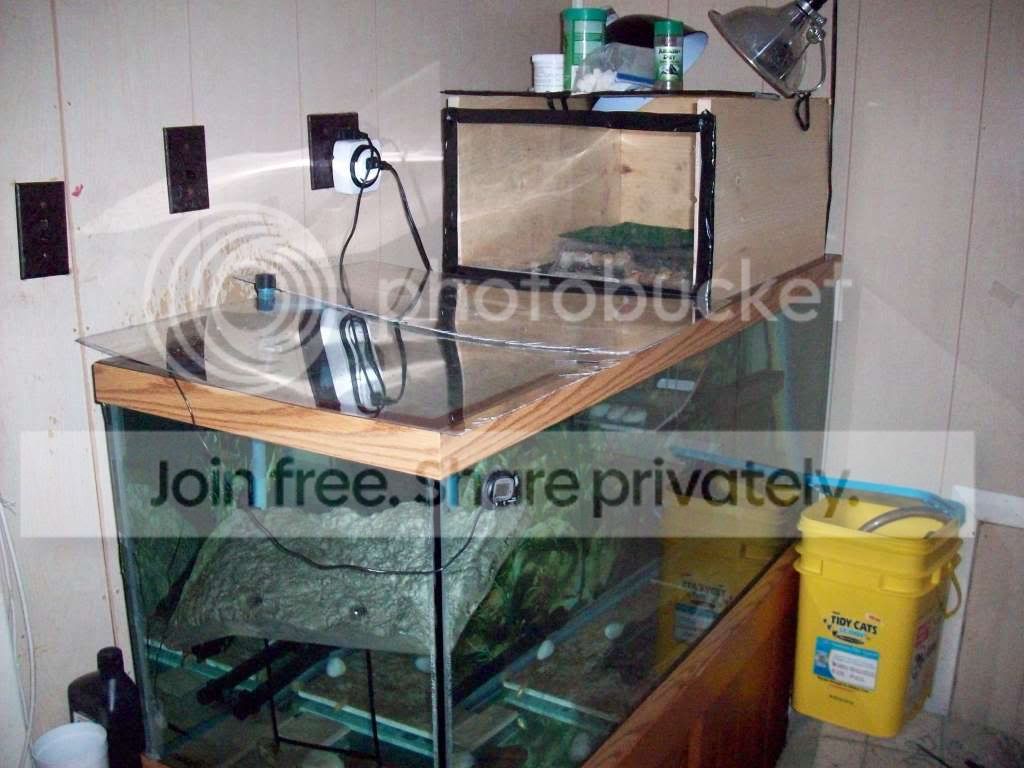
So here is the home for my RES chills! He is a 20+ specimen and I have had him for going on 13 years. He really needed a new home with more room for everything and so I turned to CList and found a 100 gal acrylic with a fluval 304 and stand for 150. I had a 404 already. I am running the 404 split on the far ends of the tank and the 304 with a spray bay just above water level and intaking from about 1/4 of the way over from the left of the tank (facing it) and emptying (spraying) into the middle.

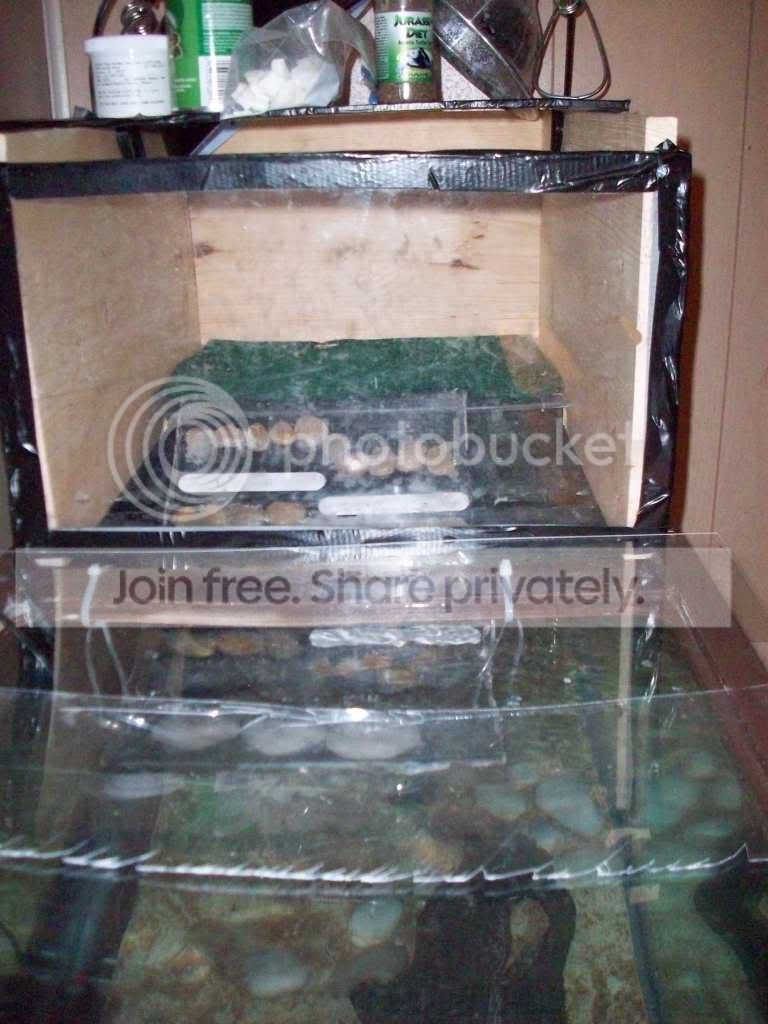
I am not done with adding plants near the rocks, and I am currently building a top for the basking tank to allow for more non-heated light and a better way to clamp / house his basking lamps. Currently I have to switch clamp lamps when lights out happens... I used the HDepot quick sand in the green bag I have played around with various coverings for the egg crate that is the bottom of the basking area and I am very open to suggestions. Right now I am running it bare and he seems to like it.


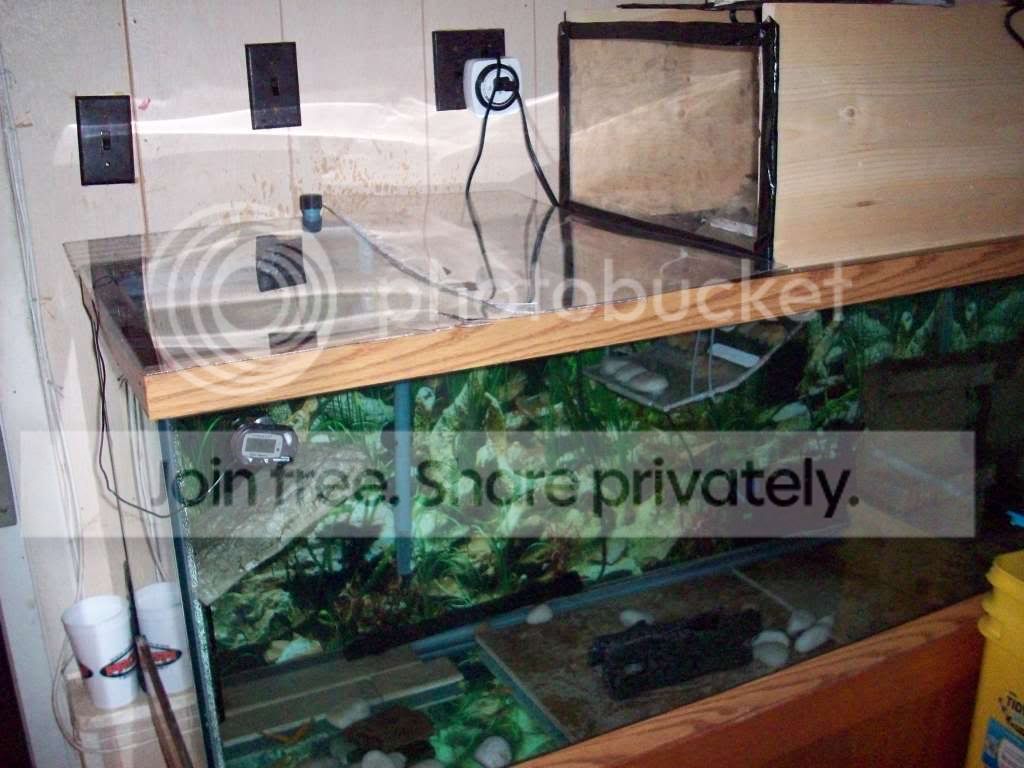
So the top tank is a bow front glass tank that leaked and I got off of CList for $10. Amazing deal for a seamless tank! I broke the bottom out then made sure I removed all the silicone that held that glass as well as any tiny shards and then flipped it over just to make sure that the turtle never finds any I missed. This also allowed me to use the lip and rim for holding the a hood in between two pieces of egg crate that was then zip tied together and thus held in place quite nicely.


I also slid in a plastic sheet or plate cut down to fit my 100 gall tanks opening and bent using a lighter and a steel pipe as a guide. After it was slid between the egg crate it was attached using zip ties. Now the "plate" I used to make this was a replacement part for a speaker my dad had in his garage for 10 years, so it had pre drilled holes which I thought would be perfect but it seemed were a bit too small for chills claws to retract from quickly...and thus I had to find a fix. After some reading i tried a non slip mat I found again in the parents garage which i cut and zip tied to the ramp while using the same ties to make some spots for him to grip. He is 8" + and he seems to like the extra support.


Now to mount it I used some material I salvaged from the bottom of the tank prior to breaking it that I then adhered to the top of the acrylic to help keep the glass tank from moving around but still allowing me to remove the tank easily and quickly. It reminds me of using very thin "rails" from a skateboard, and these would work as well if you could find the right size. Other then that the tank just sits on top of the other tank. This has been working very well and I hope to not jinx myself by saying it was that simple.

Basking is 75 W, being in soCAl makes much more overkill.

The room he is in stays pretty dry... way more then I thought it would with the tank in there. Humidity in the basking tank has not been an issue.

Temp at turtle level in the basking sweet spot: 87 F

To aid with lighting I got a cheap self contained and closed florescent from home depot for $10 and used mounting tape to attach it to the back of the glass tank so that it sits just above the top of the acrylic tank and back lights the "rocks" in the tank providing the current night lighting. The backdrop blocks most of the light so it seems to work very well and thus I have not rushed to add moon lights or any other night time lighting. The acrylic is closed for part of the area the florescent sits above, and the part that is open is blocked by the "background rocks" so there is no danger of the lamp ever getting into the water.The rocks are honestly the remains of a fountain I hacked apart to fit my need (and the holes in my tank) which I found sitting next to my neighbors trash after returning from a day of shopping pet stores and hardware stores for ideas on how to provide hiding areas for fish as well as wires, the heater, the power head, etc PLUS a spot for him to lean and nap with his body resting on something under water and just his head above... which he seems to love to do. I left the other side of the tank fairly barren as I add live plants pretty regularly which the turtle and fish promptly trash, and love every minute of.

He really seems to be loving it.

questions/comments/suggestions? fire away!

oh yeah

The tank took me:

about an hour total removing the bottom of the tank, cleaning out the silicone and quadruple checking for any glass i missed, then giving it a very good clean.

maybe an hour measuring and cutting the egg crate and zipping it into place, then bending and adding the plastic i used for the ramp and zipping it into place. This was me taking my time and working a lot of things out in my head before doing any cuts. Knowing what I am trying to achieve this would take less then half the time.

cutting the various things I have used as substrate/flooring of the basking tank - each has been about 15- 20 minutes you know, just cut and place.

cutting and mounting the "guides" which help keep the top tank in place to the top of the acrylic tank - about 10 minutes

researching what an adult res needs/wants and what others have done to come up with my plan - about 6 weeks
100 gallon tank with 30 gallon basking tank on top
1 Trachemys scripta elegans
1 Paratilapia Polleni
1 Rocio octofasciata
1 Red Astronotus ocellatus
1 Albino Astronotus ocellatus
1 Leporacanthicus cf. galaxias(l007)
B.Wile.E.
 
Posts: 1
Joined: Dec 24, 2008
Location: Thousand Oaks, CA

Post Posted: Wed Dec 24, 2008 12:21 pm   

Looks great! What a beautiful turtle :)
Is the rock on top loose? I've heard that some turtles like too push them off and smash the bottom off the tank.
Also is the UVB over the basking area? He needs it there too get the best use out off it.

It's crazy how much time we put into our pet's homes lol But they are so worth it :)
My favorite things in the world:
1 res, 3 cats, 3 bunnies, 1 dog, 2 african clawed frogs, guppies, pleco, 30+ fancy mice, 2 hermit crabs and 4 small humans
User avatar
Sassamo
 
Posts: 310
Joined: Aug 25, 2008
Location: Canada

Post Posted: Sat Dec 27, 2008 6:16 pm   

Sassamo wrote:It's crazy how much time we put into our pet's homes lol But they are so worth it :)


haha, I think the same thing every time I glance over @ the turtles. and its funny and cool how people's ATBAs are getting fancier and fancier. I think we may have perfected above-tank-basking-area-building :lol:

X2 AKITA
X2 R.E. SLIDER


Respect
ALL beings.
User avatar
Arisu
 
Posts: 450
Joined: Jul 31, 2008
Location: Northern California, USA

Post Posted: Thu Jan 01, 2009 11:46 pm   

Just thought I'd add a picture of Shelly and Finnys' ATBA. I am quite proud of it, if I don't say so myself :D And even more important, the turtles LOVE it!!! They bask everyday now. Oh, FYI...that is a MVB. I highly recommend them also.
Image
Image
And the big ham, shelly!!
Image
Keely
 
Posts: 12
Joined: Nov 20, 2007

Post Posted: Fri Jan 02, 2009 1:14 am   

Keely wrote:Just thought I'd add a picture of Shelly and Finnys' ATBA. I am quite proud of it, if I don't say so myself :D And even more important, the turtles LOVE it!!! They bask everyday now. Oh, FYI...that is a MVB. I highly recommend them also.
Image
Image
And the big ham, shelly!!
Image


oh pretty! how did you make the basking area & ramp?
1 RES: Crush, 7" long 5 years old
1 hedgehog: Sonic, 7 months old
User avatar
francinemarie
 
Posts: 493
Joined: Sep 20, 2008
Location: US

Post Posted: Wed Jan 07, 2009 7:07 pm   

[url=http://img442.imageshack.us/img442/2576/abovetankplatformkatzspaf6.jpg]Image
(click for bigger pic)[/url]

Here is our above-tank basking area which also doubles as a land bridge between the two tanks. I built this about a year ago after being inspired by others above-tank basking area posts here, thanks!!

Each of those tiles are 18 x 18 inches, and each tank is 40 gallons.

Unfortunately, the little turtle Mieko bullies the bigger one Maximus, which is why we have to separate them now. They still hang out together as much as they can as you can see!

I designed this in Google Sketchup, I also designed and built the stands that each tank rests on. I took loads of pictures during the construction, and I'd be happy to post more details if anyone wants to build something like this.
katzsplat
 
Posts: 2
Joined: Oct 16, 2007

PreviousNext

Return to Habitat - Indoor

Who is online

Users browsing this forum: No registered users and 95 guests